Categories
MetaBlogging

7 Ways to Brand Your Blog

This post ran a while ago, but the advice is still good!

Are you a friend and not that into branding? I need your help really quickly: skip down to #7 and see why!

McDonald’s does it. Nike does it. Coke does it. Does your blog brand?

Blog branding, in practical terms, is providing a unique experience for your blog visitors as well as promoting your blog’s name, look, feel and mission throughout the Internet. In simple terms like these, blog branding sounds easy. But then you look at your blog and . . . now what?

Here are seven ways to brand your blog, both on your site and around the Internet.

1. Name. Pick an original name for your blog. As part of this name, consider registering the .com version of this name, if it’s available. If it’s not available, consider the .net or .org extensions, but add those to the name of your blog (i.e. ‘MamaBlogga.org’ instead of simply ‘MamaBlogga’—people tend to assume that a name will end in .com unless told otherwise, and we want them to find your blog!).

The name of your blog should also be short, sweet, memorable, easy to spell and say, and on-topic. Now, it should only take you about 20 years to find something that fits all those criteria, but a good name is essential in helping to distinguish your blog from the other 70 million blogs out there.

 
2. Purpose. Having a clearly-defined purpose accomplishes several branding goals: it gives your site a focused topic, narrows what keywords you should target for SEO purposes, provides you with things to post about and (hopefully) sets you apart from other blogs in your genre. You can address your blog’s purpose directly on your About page, but don’t forget to refer to it regularly as you post, at least to help you focus. See also ProBlogger’s article on creating a blog mission statement.

 
3. Design. Probably the most common way we think about to brand your blog, an original design can do wonders for your branding. Are 5000 other blogs running on the same default theme as yours? Do something to distinguish yourself—customize your colors, pick new fonts, add a custom blog header. You’re not trying to be obnoxious, but you do want your blog to stand out from the crowd.

 
4. Consistency. Quick, what colors does McDonald’s use? For me, even saying the name “McDonald’s” brings up an instant mental image of the golden arches (on a red field). One underemphasized key to successful branding is consistency.

Use the same look and feel throughout your blog. Wherever possible, use the same tone, colors and graphics—even if it’s not actually part of your website. For example, if you use FeedBurner to offer email subscriptions, customize your emails so that the fonts, colors and graphics are as similar to your site as possible. See #5 of the Seven Ways to Master FeedBurner for instructions on how to do that.

 
5. Publicity. Get yourself out there! Get visitors (and hopefully links) to your site, whether by commenting (see the next item in this list), using social media like StumbleUpon or Technorati, or simply by e-mailing people about your site. One way to bring in visitors that I’m particularly fond of is guest blogging, which not only gets you links and raises awareness in your blog but also showcases your writing for an interested audience.

 
6. Commenting. If your blog’s name is not the same as your name, when commenting on other blogs, enter your blog’s name in the Name field. I usually do this as “Jordan (MamaBlogga)” or “Jordan @ MamaBlogga.” I could also just use “MamaBlogga”—again, consistency is key. If the the blogger has removed the nofollow from their comments, it even gets you search engine credit.
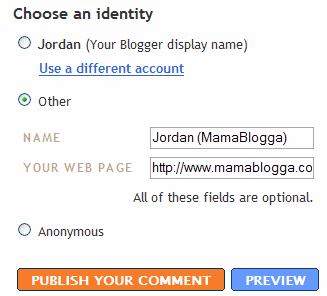
blogger other commentsAs I’ve mentioned before, when commenting on a Blogger blog, it’s easy to get the link to point back to your site (rather than your Blogger profile). If the blogger allows this option, click the “Other” radio button and enter your name and URL.

Also see ProBlogger’s post on 10 things that will hurt your blog’s brand when commenting, and avoid those like the plague.

 
7. Social media. Aside from using social media to promote your brand and your blog, customize it wherever possible. Sign up for social sites using your blog name (or, if building your personal brand, your real name). As soon as you hit 25 Likes on your Facebook page, you can customize the URL to match your brand’s name, too. (As long as it isn’t taken.)

And speaking of Facebook, today I’m premiering the MamaBlogga Facebook Page! If you could go on over there and click “Like,” I’m looking for those first 25 Likes so I can customize the URL.

What’s cool/different about the MamaBlogga Facebook page? I don’t quite know yet—come leave a comment on MamaBlogga’s wall to let me know what you’d like to see—blog posts imported there, finding encouragement from other moms, daily pep talks quotes, missions to help us appreciate motherhood now? You tell me!

Got branding down? Be sure to check out ChrisG’s Branding Blog Post Round Up for a great collection of branding tips and techniques from blog branding to personal branding.
Categories
MetaBlogging

Blog tip: bring your blog into the new year!

I’m excited for 2012: so excited that I updated all my blogs on December 31.

What do you need to do to bring your blog into the new year? Check for any copyright dates on your blog. I like to put them in the footer, but I know some people add them into each post, or in the feed. Make sure the copyright date runs through 2012!

Be sure to check multiple places. I hate finding an out-of-date copyright buried on one of my sites in mid-April :\ .

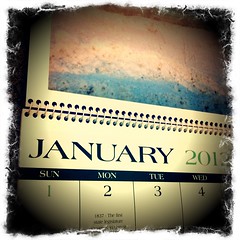
This year, I’m also trying to keep a blogging calendar. I’m using a paper calendar that we got free in the mail. With themed days, I can easily fill in the post ideas a month in advance. I try to write them on weekends, and my blog is ready for the week!

What else do you do to bring your blog into 2012?

Photo by Dan Moyle

Categories
MetaBlogging

Custom domains simplified | Blogger Buzz

Okay, so here’s the deal: I think WordPress is a fantastic platform and I love it and I’d never go back to Blogger. BUT Blogger is a good platform and for many users, it’s a better fit than WordPress would be. When my sister wanted to start a craft blog this year, we went with Blogger because we all knew how to use it (and hence I’ve used Blogger more this year than I have since, oh, 2007).

However, if you’re looking to look “professional” or “branded,” I strongly recommend using Blogger’s Custom Domain feature (I know, I’ve been beating this drum for almost five years). This moves your blog from YOURBLOGNAME.blogspot.com to YOURBLOGNAME.com (or whatever address you can get). Setting this up required a little bit of technical know-how with the domain registrar (the company where you buy the domain name).

Until now. If the technical bits have kept you from your own domain, at least one registrar can help. Blogger Buzz announced last month that custom domains is simpler for GoDaddy customers now. GoDaddy has added a tool to update the settings on their side to get your blog onto its own domain with just one click. Nice!

If you register a domain, don’t forget about private registration!

Categories
MetaBlogging

WordPress on Bluehost: the Post page in depth

This entry is part 3 of 5 in the series Set up WordPress on BlueHost

Last time we covered how to make posts and pages. This time we’ll look at a few more features of the Add New Post or Edit Post page.

Posts are the basic unit of a blog. They are not to be confused with Pages, however. Pages are usually where you place special “timeless” information such as your About page, your Contact page, etc. Your posts are generally for chronological or “regular” blog entries.

To write a post, go to Post>Add New, or click on the New Post button on the top bar. The top text box below “Add New Post” sets the post title, which appears at the top of the post. If you don’t set a post title, it will be published without a title. Once you input a title and WordPress autosaves (or you click the Save Draft button), a field appears below the title box with the URL the post will have, including the “slug”: the URL name for this post (highlighted in yellow).


If you don’t give the post a title before you save the draft (or WordPress autosaves one), WordPress assigns the post a number. Every post in your WordPress blog has a number, of course. Saving a draft of the post with a title will replace the slug.

If you’d like to change the slug yourself—to make it easier to remember, shorter, or more friendly to search engines—click on the Edit button. The slug portion of the URL turns into a text field. Be sure to save your changes.

Below the title box is the post box. In the box, you type the content for the post. At the top of the box are the buttons to upload media: image, video, audio, or other media (we’ll talk more about adding pictures and media next time).

Most of the buttons above the post window are fairly intuitive. From left to right, they are:

  • Bold
  • Italicize
  • Strike through (a popular convention in blogging)
  • Bulleted list
  • Numbered list
  • Blockquote (indents text; also may add some styling depending on your theme)
  • Align left
  • Align center
  • Align right
  • Create link (only an option if you have selected text)
  • Unlink (only an option if you have selected linked text)
  • Split post with More tag (creating a Read more. . . link on your blog homepage and feed)
  • Spellcheck (with pull down for languages)
  • Toggle fullscreen mode (makes the post box take up the whole browser window)
  • Show or hide advanced toolbar (“Kitchen Sink” they call it):

Clicking on the last button adds a second toolbar below the first.

The advanced toolbar buttons, from left to right, are:

  • Preset formatting styles (drop down menu)
  • Underline
  • Align full (justified)
  • Select text color
  • Paste as plain text
  • Paste from Microsoft Word
  • Remove formatting
  • Insert/edit embedded media
  • Insert a custom or special character (letters with accents, etc.)
  • Unindent (only an option if the paragraph you’re editing is indented)
  • Indent
  • Undo
  • Redo
  • Help

Other capabilities on the New Post page:

  • Drag and drop the individual boxes to customize the page so you can find all the things you use commonly. Just click on the title bar of a box and hold to drag.
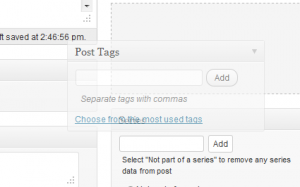
  • Toggle each box open or closed for clutter/cleanliness. Just click the down triangle on the title bar of the box (shown at right, it appears when you hover over the box).
  • Assign a post a category—be sure to check the box beside the category name in the Categories box at the right, below the Publish (this may also be below the Tags box). (If this box is ‘closed,’ click the triangle at the end of the box to ‘open’ it.)

  • Add a new category—click +Add New Category. (See also Creating Categories.)
  • Add tags to a post (topics addressed in a post which are not as central or important to your blog as topics covered in categories)–use the Tags box. This is on the right side below the Publish box. After typing the tags, click Add. To remove tags, click the x next to the tag.
  • Disable comments and/or pings (links back from other blogs that link to your post)—use the options in the Discussion box in the main column.
  • Select a different author for a post—use the Author box. (If this box is ‘closed,’ click the + sign by the title of the box to ‘open’ it.)
  • Set an optional excerpt—type a short summary or cut-and-paste a section of your post into the (Optional) Excerpt box. This is included in the code of your page and may be used by search engines to display info about the page on the search engine results page.
  • Send a trackback (a comment-like notification to another blog post that your post includes a link to it)—put the URL of the linked post in the Send Trackbacks box. However, WordPress can also be set to automatically send trackbacks to any link included in your post by checking the first option under Settings>Discussion which reads “Attempt to notify any blogs linked to from the article (slows down posting.).”
Categories
MetaBlogging

Baking time

Apparently, I didn’t hit “Publish” on this post a few weeks ago when I meant to. Catching up now!

A while back, we talked about the “fail-safe” fun activities we use with our kids when we’ll go crazy if we have to listen to them screaming/whining/bickering for one! more! second! One of mine is baking. Yesterday I blogged at the Power of Moms about Baking It Till We Make It,” on our baking and our other go-to fun activities.

If you’re visiting from that post, welcome! Please check out some of my favorite posts on fulfillment:

Stay a while! Subscribe! And thank you for reading!

In the mean time, I’m . . . well, I’m definitely not baking today.

Have fun today!

Categories
MetaBlogging

WordPress on Bluehost: Posts & Pages

This entry is part 4 of 5 in the series Set up WordPress on BlueHost

This post originally appeared in March 2010 as part of the Getting Started with WordPress.com series.

We’re continuing our (last posted so long ago you’ve probably forgotten) series on setting up WordPress on Bluehost. This week to look at the basics of posting and creating pages.

When you set up your blog, you can how to create your first post immediately—but there’s a lot more information and options on the post page. To get to the edit post or add new post page, you can use your dashboard or the gray bar at the top of your screen when you’re logged in to WordPress. The Posts menu is on the left-hand side:

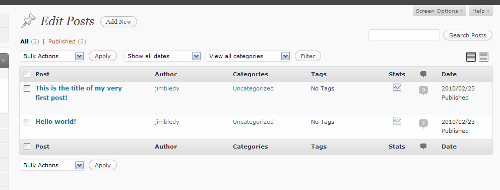
The Edit option takes you to a list of your posts (click to enlarge):

Here, the posts you’ve saved as drafts, published or scheduled on your blog are listed in chronological order. You can click on a post title to edit it individually. When you hover your cursor over the title of the post, you get additional options below the title: Edit (which does the same thing as clicking on the post title), Quick Edit (which lets you change things like tags, categories, title, and date right in the Edit Posts page), Trash (which moves the post to your trash, where you can salvage it later if you want), or View (to see what it would or does look like on your blog).

On the same line as each post title, you can also click on the author name to only show posts by a certain author, or the category name to narrow your view to posts in that category. Each post’s viewing stats and comments are also accessible from here.

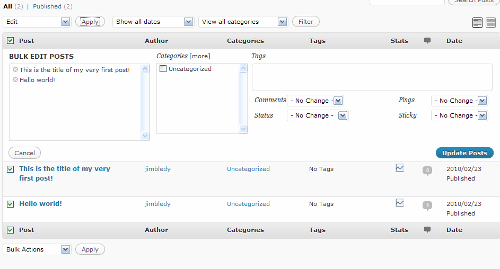
You can also edit multiple posts from this screen. Check the boxes next to the posts you want to edit and use the drop down menu labeled Bulk Actions to edit or delete multiple posts. This is waht it looks like when you choose to edit multiple posts (again, click to enlarge):

This way, you can change multiple posts into different categories, add tags to multiple posts and change whether they can have comments or are even published—many of the same things you can do for a single post in Quick Edit.

The next option on the Posts menu is Add New. (You can also add a new post by clicking on the New Post button on the top gray menu bar.) We looked at how to create and publish a post last time; this time we’ll look at the rest of the post options on this page.

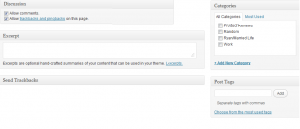
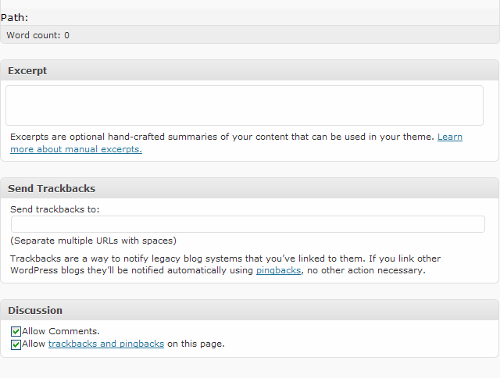
Below the post text box, there are three boxes for more information: Excerpt, Send Trackbacks, and Discussion. For the most part, these are pretty self-explanatory—especially since they include an explanation 😉 .

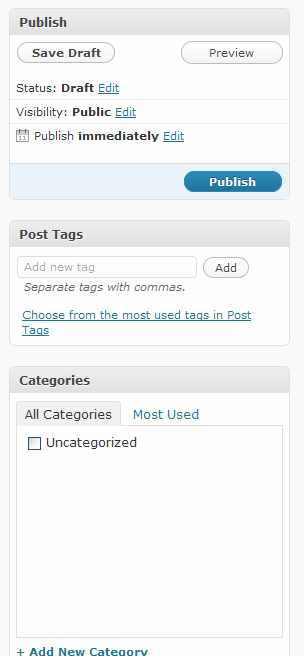
To the right of the post box, there are three more boxes with options: Publish, Post Tags and Categories:

The Publish box has the Save Draft, Preview and Publish buttons. (Once you’ve published a post, these buttons are replaced with a Preview Changes button up top and an Update button on the bottom).

This box also has more options: You can click Edit by Draft to change the status from Draft to Pending Review (for drafts you’ve completed but aren’t ready to schedule). Once you’ve published, Published is added to this option list. Clicking Edit next to Visibility allows you to set a post as public, private or password-protected (by a password you set). Also under this option, you can set a post to always remain on the front page of your blog, such as a short post describing your blog or perhaps inviting visitors to introduce themselves.

The Post Tags box is used to add tags to a post. These are usually listed on your post and can let your users see all your posts on a particular, narrow topic. Tags are generally more specific than categories (the next box down): if you blog about knitting, for example, you might have a category for all your Projects, but tags for Finished Objects, Sweaters, Cardigans, etc. When adding tags, be sure to hit the Add button (or the Enter/Return key) AND save the post/draft to save them. (You can remove a tag by clicking the x next to it.)

The Categories box lets you categorize your posts by the broader topics of your blog. You can also add a new category from right inside this box—just click +Add New Category and you’ll get a text box to name your new category.

Note that the Add New Post page can be customized: you can drag and drop all six of these boxes to rearrange the page however you’d like.

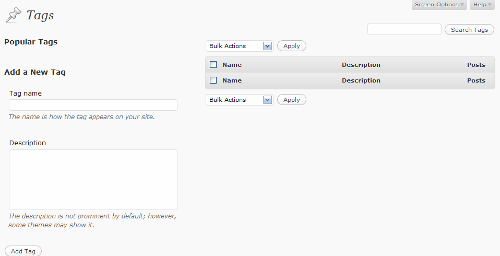
Also on the Posts menu are pages to manage all your tags and categories. The Manage Tags page (click to enlarge):

From here, you can add new tags, as well as edit the descriptions of existing tags. Once you’ve published posts with tags, your most used tags appear under Popular Tags. Also, an alphabetical list of the tags, their descriptions and the number of posts using those tags will appear to the right. As with posts, you can use the check boxes to select multiple tags to delete, or you can edit individual tags (such as to add a description) by clicking on the tag’s name. Clicking on the number of posts using them gives you a list of posts (on the Edit Posts page) using that tag.

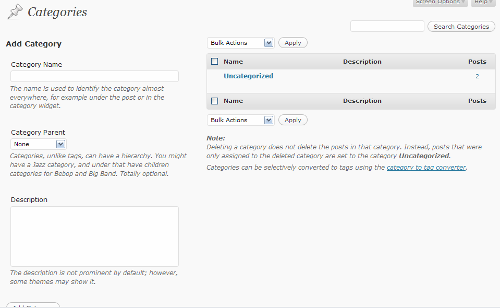
The Categories page is very similar (click to enlarge):

The most notable difference here is that “categories, unlike tags, can have a hierarchy.” Tags are all one level, but Categories can be “parents” or “children”—you can have one category broken up into multiple subcategories. With our knitting blog example, maybe under the Projects category, you have three subcategories: Cardigans, Pullovers and Socks.

(Why use subcategories instead of tags? If a topic is really central to the purpose of your blog and something you’ll be posting about frequently, but falls under the purview of a broader subject of your blog, a subcategory might be the perfect fit—but only you can decide what should be a tag and what should be a category.)

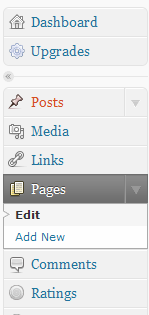
In addition to Posts, you can also have Pages on your blog. Posts are the temporal stuff—the day-to-day news updates, the regular content on your blog. Pages are for important information not tied to time, like your About or Contact pages. The Pages menu is further down on the left-hand side of WordPress:

The two options, Edit and Add New, lead to pages almost identical to the Edit and Add New Posts pages.

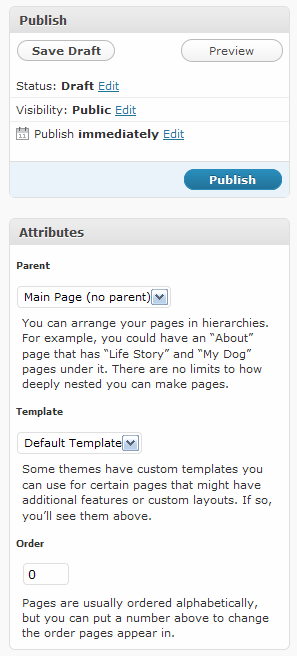
The biggest difference in creating pages is that, like categories, you can have subordinate pages—for example, your About page might have child pages on your Biography, your Portfolio, etc. This is set in the Attributes box below the Publish box on the Edit or Add New Page page:

You can also use a custom template (if you dare) for certain pages—a different layout for a particular page, for example. The page Order determines what order your pages are displayed on your menu bar on your blog. If it’s not set, the pages are listed by date published.

Whew! Everything there is to know about the Posts and Pages menus on WordPress!