Categories
MetaBlogging

D is for Draft

All blogging platforms allow you to start working on a blog post and save it for later as a “draft.” However, not all blog platforms are created equal. If you’re using Blogger, your drafts might be messing up your readers’ experience.

If you are saving draft versions of posts in Blogger, Blogger may be publishing those posts to your RSS feed. I have seen this on a number of blogs for probably over a year. The problem appears to be intermittent, so it might not have affected you yet.

Why is this a problem? Well, for one, if your post isn’t finished (and that’s clue #1 for me when I see this in my feed reader), your readers are going to be a little confused. It’s less than impressive, you know?

Secondly, regardless of whether the post is finished and polished, your readers might want to click through to comment—but when they do, they’re taken to a page that says the page doesn’t exist. Can’t tell you how many times that’s happened to me :-\ .

Finally, when you publish the post later, it may not show up in feed readers again.

There’s a possibility that this has something to do with another factor, such as scheduling posts to appear in the future.

I can’t find any documentation on this issue from Blogger, but I’ve seen this happen with half a dozen different Blogger blogs. However, if you’ve had this problem on your blog (off the top of my head, affected blogs I’ve seen include edittorrent, The Blood-Red Pencil and ali cross), I recommend pointing this out to Blogger Help.

Bottom line: if you have a time-sensitive post (or just want be absolutely sure your readers see your post when it’s ready, and only then), try using a test blog to draft, then cut and paste to your main blog.

What do you think? Have you ever seen this problem?

Categories
MetaBlogging

Blogger Finds the Happy Feed Medium

I’ve long said full feeds are the best option for bloggers and readers. But for some posts, a full feed isn’t the best option—and now Blogger users have even more feed options with the addition of Jump Breaks in the feed.

Jump Breaks have been around since September 2009 (announced on 09/09/09). Up until a few days ago, you could use Jump Breaks on your blog to truncate posts displayed there. Write a long post, but don’t want it making your homepage load so long? Insert a Jump Break a few paragraphs in, and the main page of your blog will only display the post to that point, with a link to see the full version.

To insert a Jump Break, you can click on the Edit HTML tag and enter <!– more –> . Or, in the Compose tab, you can click on the Jump Break button:

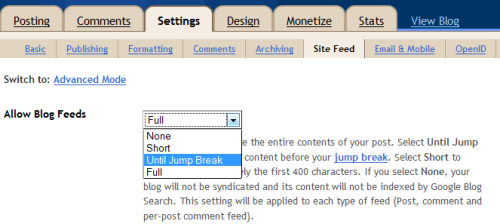
Now you can use the same function in your feeds. To enable the Jump Breaks in your feed, go to Settings > Site Feed. By “Allow Blog Feeds,” select “Until Jump Break.”

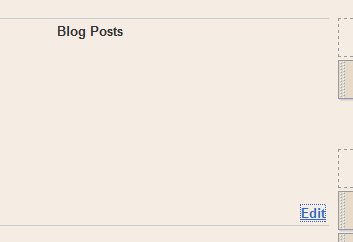
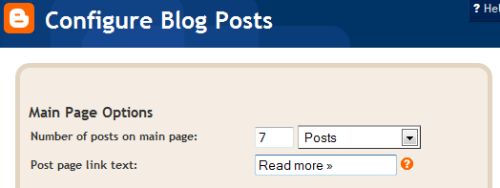
You can even customize the “Read more” text. Go to Design > Page Elements. Under Blog Posts, click Edit.

Then just change the Post Page Link Text in the popup window:

Why would you want to use Jump Breaks?
There are a lot of reasons to use Jump Breaks in your feed and on your blog. For example:

  • To cut off a long or image-heavy post that would take a long time to load.
  • To customize when and where you publish a “snippet” or “preview” feed.
  • To keep your homepage from getting too long.
  • To display a larger variety or number of posts on your homepage.

On other blogging platforms
If you use WordPress, this all might look a little familiar: you can also split posts in WordPress with the <!– more –> tag. You can type that in the HTML version of a post, or just use the more button: in the Visual tab or the HTML tab . You can even customize the text of the link it inserts, if you’re feeling ambitious.

In TypePad, you can split posts if you’re a premium subscriber.

What do you think? Do you or would you ever use this function? Why or why not?

Categories
MetaBlogging Fulfillment

7 ways to keep the computer from ruling your life

I know I need to work on spending less time on the computer—especially when I need to be paying attention to my kids—and I doubt I’m the only one. So I’ve come up with a few ways to get off the computer—keep the computer from ruling my life.

Make it harder to get on

  • Put away the laptop

It doesn’t seem like much, but closing a laptop and sliding it under the couch are two “barriers to entry” that make it harder to just sit down and get lost in the Internet. Similarly, for a desktop:

  • Turn off the monitor and/or CPU

Okay, it’s not hard to turn on a monitor or a computer and wait for it to boot up—but just those few extra seconds may make it less “worth it” to flop into the chair and shake the mouse for instant gratification.

Get productive while you’re on the computer
Like I said, I’m not going to tell you to abandon the computer altogether. But by focusing on the useful aspects of the computer, we can take advantage of them without getting lost in the Internet.

Multimonitor(2).jpg

  • Keep a list of tasks

Whenever I’m careful about not using the computer, I find myself often thinking, “oh, I should look that up,” “oh, I need to remember to go to this site,” or “oh, I need to check that.” But then I sit down and can’t remember a single one. So I try to keep a handwritten list of things I want to do on the computer/Internet.

  • Pre-plan

Along those lines, you can plan out things you need to do while on the computer—whether that’s writing another scene in your manuscript, making your rounds on blogs or crafting a post of your own. Believe it or not, paper and pen still work for brainstorming, charting, planning, outlining, drafting, etc., etc.

  • Use a timer

If you have something more than just a simple “look this word up” or “check on the status of this bill”—like, for example, a blog post—using a timer can help you to focus. If you’ve ever done FlyLady, you know how using a timer can help for a short burst of activity and productivity. I can attest to this even for creative purposes—the fasts I’ve ever written was with the Write or Die timer—933 words in 15 minutes. (For some people, of course, the pressure might stifle the creativity they need, but you can give it a shot.)

And get off the computer
Harder than it sounds.

  • Recognize when you’re no longer “using” the computer

Using the Internet can be an addictive behavior. I know that I use it as an emotional retreat and avoidance mechanism when I feel overwhelmed by my kids or other responsibilities. (It doesn’t help.) But if we learn to tell the difference between using the computer as a tool versus using it as an emotional crutch, we can stop ourselves.

  • Recognize when your family needs you

You can tell when your kids need you—they pester you, they make bigger and bigger messes, they argue and escalate, and every other sentence out of your mouth is, “One more minute—I just have to finish this.”


Changing habits to keep ourselves from defaulting to that behavior, and focusing while we are on the computer can help us to limit our time on the compute rand the Internet and get out there to live our lives instead of just blogging about them 😉 .

What do you think? How do you get off the computer?

Photo by Federico Morando

Categories
MetaBlogging

Setting up WordPress on Bluehost

This entry is part 1 of 5 in the series Set up WordPress on BlueHost

For a while I’ve offered a free PDF on how to set up WordPress on BlueHost to people who sign up for BlueHost with my affiliate link. But now I’m going to spread the love: I’m publishing all of the PDF here in a series on setting up a WordPress blog on BlueHost! So if you’ve been waiting to put your blog on BlueHost because you were worried about the technical stuff, this might be the perfect time!

BlueHost is one of WordPress’s recommended hosts and I’ve been with them for years. I definitely recommend BlueHost as a hosting company—and setting up WordPress on BlueHost just got easier. Disclosure: While I am a paying customer of BlueHost, I am also an affiliate for them. I receive a small percentage of any hosting purchase you make after clicking on the links to BlueHost in these articles.

Initial Setup Steps

If you did not register your domain through BlueHost, you will most likely have to set your nameservers. If, for example, you used GoDaddy to register your domain, login to GoDaddy. Click on the domain name you’re using with BlueHost. Once you get to the domain page, there is a button for Nameservers—click on it. A popup window will appear. Select “I host my domains with another provider.” The nameservers are set to something like “NS46.DOMAINCONTROL.COM.” Set the name servers to BlueHost name servers:

NS1.BLUEHOST.COM

NS2.BLUEHOST.COM

Each of these name servers should be on a separate line. There should be no other name servers. If your confirmation email from BlueHost listed other name servers, use those instead. Select “OK” to save your selection.

Once the nameservers have been set, it may take up to 48 hours for these settings to propagate around the web, so you may have to wait until you can access your website.

Login to BlueHost

Once your name servers have taken effect, you’ll be able to login to BlueHost from http://www.yourdomain.com/cpanel using your username and password. If you didn’t set your username to something specific, your user name is usually the first eight characters of your domain. You can also login from BlueHost’s homepage using your domain name and password. (All of this should be included in the information that BlueHost sent you when you signed up.)

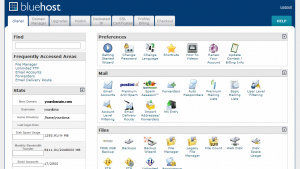
This should take you to your website’s control panel or cPanel:

Once you’ve logged in to your cPanel, you will want to complete the Getting Started Wizard that pops up if it’s your first time in your cPanel. This will help you understand many of the ins and outs of BlueHost and the cPanel as well as set up your first e-mail account(s).

Set Up WordPress

Once you’re into the cPanel home, look under Software / Services to find Simple Scripts.

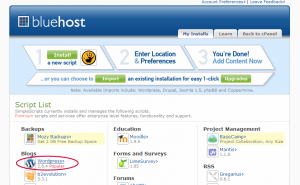
Click on Simple Scripts, which is an auto installer that vastly simplifies using many applications. (You can also use the Find box in the upper left hand corner—just type in “Simple Scripts” and it will show up in the right panel.) On the Simple Scripts page, there’s a list of software that it can install for you. Under Blogs, click on WordPress (circled in red below).

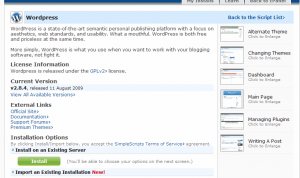
This will take you to a page with information about WordPress. Click on the green Install button to begin your new installation. (Even if you’ll be importing a blog from another platform, you don’t want to use the Import an Existing Installation option.)

Note that the right hand side of the page also has screen shots of a few steps in WordPress.

After you click Install, you’ll go to the first step of the installation.

Under Step 1, select the most recent (highest number) version with (Stable) beside it. For Where would you like your WordPress installed?, if you have more than one domain or subdomain on BlueHost, select from the pull-down menu. The second box is for if you want a your blog to be in a directory. I advise against this if your blog is the main portion of your site. In fact, WordPress has the ability to create pages and subdirectories to maintain the look and feel throughout your site. Unless your blog is truly tangential or not a significant part of your site, I recommend installing your blog in the root directory. To do this, leave the second box empty.

Under Step 2, click on Click here to display>

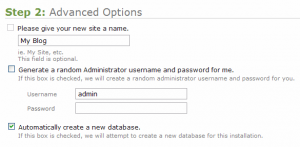
This will let you set options including the name of your website. Note that these can also be set or changed from inside WordPress.

Under Please give your new site a name, type in the name for your website. The site name is automatically set to “My Blog,” but you’ll probably want to change this. If your blog has a name or general title, or if you’re renaming your blog (especially to match your domain name), put it here. This title will appear in the header (both coded and visual) of every page of your blog.

Leave the next checkbox unchecked. Set the username and password to something you can easily remember. You may use your name or pseudonym as your username. This is what you’ll use to log in to WordPress, so it’s important to keep this information handy.

Leave the checkbox by Automatically create a new database checked.

Under Step 3, read the terms and license and check the checkbox. Then click the green Complete button.

You’ll go to a set up screen, which you can close if you want. If you stick around, you get the success message as well as links to your WordPress login:

Your site URL is what you set it to in Step 1, and your username and password are what you set them to in Step 2. The Login URL is your site URL with wp-admin added to the end (for WordPress administration). If you just barely set your name servers, it may take a while for them to be set; otherwise, you’ll be able to log in to WordPress using the address, username and password listed there. This information is also emailed to you.

Note: WordPress periodically releases updated versions of its software. To update an installation, go back to Simple Scripts. Your installed scripts are listed above the Script List, and you’ll have the option to update them. Click on the Upgrade Available link to update your blog. There is a potential for this to cause some problems with your blog or to reset some settings, so do backup your blog before updating. Because Simple Scripts’ upgrades are incremental, you may have to repeat the process if your installation is very old and you want to update to the latest version. Always deactivate all plugins before updating your WordPress installation.

Your blog is now set up. If you go to your website, you should now see the default template for WordPress. Naturally, you’ll probably want to select or commission a custom theme. (Next week!)

Ready to take the plunge? Sign up for hosting with BlueHost and set up your WordPress blog today!

Categories
Fulfillment MetaBlogging

Four years of fulfillment: blogoversary reflections

It snuck up on me again: today is my blogoversary. Blogiversary? Whatever.

Four years. I’ve been blogging for four years. I keep thinking that must be wrong, but then I remember I started when Hayden was a few months old, and now he’s four, so it must be true.

If I’d been paying attention (and not distracted by something so non-time-consuming as a new baby, a toddler, and a preschooler 😉 ), I could have had a wonderful party set up here for you today. Instead, you’ll have to make do with my thoughts. But, hey, that’s what blogging’s all about anyway, right?

I started this blog for the same reason lots of people start their blogs: I wanted to keep my far-off family updated on my kids’ (well, kid’s at the time) life. And I was bored.

Actually, the boredom part played a big role in starting the blog. While I knew being a mother was where I belonged, I still felt overwhelmed—and bored. I vacillated between wondering How can I handle all this? to Is this it?

And I kept waiting for the sense that I was in the right place, doing the right thing—that all this effort was worth it. Fulfillment. But no magic wand bestowed fulfillment on me. I didn’t wake up one morning with the peaceful assurance that one day—perhaps even that very day—my children would rise up and call me blessed.

I hoped I wasn’t the only one.

Over the last four years, a lot has changed. Our family has grown—and slowly, but not-so-steadily, so has my contentment with motherhood, my current season in life. I’ve come to learn that “finding” fulfillment is misleading. We choose happiness, and then it comes to us.

It’s something we must recapture every day, sometimes. It’s easy to lose. To be honest, a big part of the reason why this blog has been so quiet these last few months is that I lost it, big time. (And some days, it felt like I was seriously “losing it”!)

Things have been wonderful since Rachel was born, even being on my own for the last four days. It’s not because the nature of the thing—motherhood—has changed. My capacity for doing, on the other hand, has. The newborn days are still tough (I swear Hayden and Rebecca could be put down once in a while…), but I know they’ll come to an end, and my tiny little girl will grow into a toddler who’s stringing together four and five word sentences (before her second birthday!), and then a preschooler making amazing connections in logic and reasoning, and on.

I’m trying to treasure them as they are now and imprint them on my heart at each stage, because soon the amazing new things they’re doing and saying will fade in novelty, or out of their vocabularies forever. (Rebecca just stopped calling her brother “Hee-ah” last week. “Hay-DEN,” she corrects us.)

How do you treasure today? How has your foundation for fulfillment evolved over time?

Categories
MetaBlogging

Beginners’ Guide to WordPress: Posts & Pages

This entry is part 2 of 2 in the series Beginning with WordPress

We’re continuing our series on getting started with blogging, bouncing back to WordPress this week to look at the basics of posting and creating pages.

Previously, we looked at how to create your first post—but there’s a lot of information and options on the post page that we didn’t cover. To get to the edit post or add new post page, you can use your dashboard or the gray bar at the top of your screen when you’re logged in to WordPress. The Posts menu is on the left-hand side:

The Edit option takes you to a list of your posts (click to enlarge):
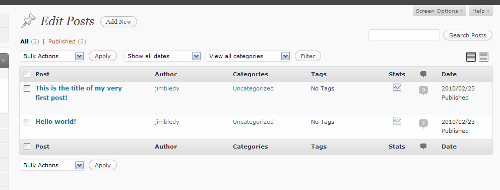
Here, the posts you’ve saved as drafts, published or scheduled on your blog are listed in chronological order. You can click on a post title to edit it individually. When you hover your cursor over the title of the post, you get additional options below the title: Edit (which does the same thing as clicking on the post title), Quick Edit (which lets you change things like tags, categories, title, and date right in the Edit Posts page), Trash (which moves the post to your trash, where you can salvage it later if you want), or View (to see what it would or does look like on your blog).

On the same line as each post title, you can also click on the author name to only show posts by a certain author, or the category name to narrow your view to posts in that category. Each post’s viewing stats and comments are also accessible from here.

You can also edit multiple posts from this screen. Check the boxes next to the posts you want to edit and use the drop down menu labeled Bulk Actions to edit or delete multiple posts. This is waht it looks like when you choose to edit multiple posts (again, click to enlarge):
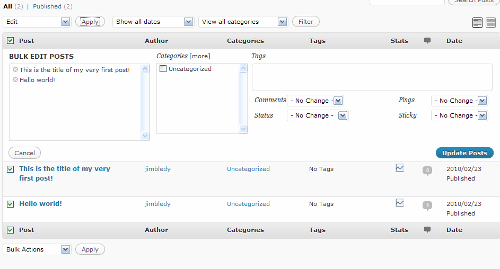
This way, you can change multiple posts into different categories, add tags to multiple posts and change whether they can have comments or are even published—many of the same things you can do for a single post in Quick Edit.

The next option on the Posts menu is Add New. (You can also add a new post by clicking on the New Post button on the top gray menu bar.) We looked at how to create and publish a post last time; this time we’ll look at the rest of the post options on this page.

Below the post text box, there are three boxes for more information: Excerpt, Send Trackbacks, and Discussion. For the most part, these are pretty self-explanatory—especially since they include an explanation 😉 .
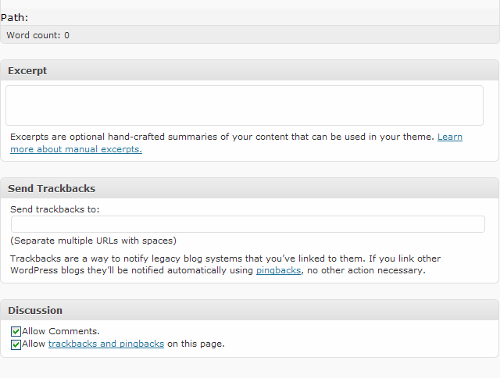
To the right of the post box, there are three more boxes with options: Publish, Post Tags and Categories:
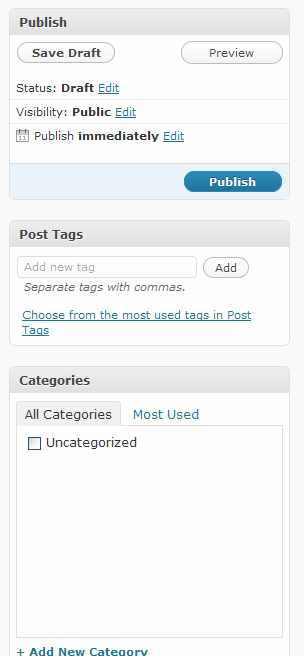
The Publish box has the Save Draft, Preview and Publish buttons. (Once you’ve published a post, these buttons are replaced with a Preview Changes button up top and an Update button on the bottom).

This box also has more options: You can click Edit by Draft to change the status from Draft to Pending Review (for drafts you’ve completed but aren’t ready to schedule). Once you’ve published, Published is added to this option list. Clicking Edit next to Visibility allows you to set a post as public, private or password-protected (by a password you set). Also under this option, you can set a post to always remain on the front page of your blog, such as a short post describing your blog or perhaps inviting visitors to introduce themselves.

The Post Tags box is used to add tags to a post. These are usually listed on your post and can let your users see all your posts on a particular, narrow topic. Tags are generally more specific than categories (the next box down): if you blog about knitting, for example, you might have a category for all your Projects, but tags for Finished Objects, Sweaters, Cardigans, etc. When adding tags, be sure to hit the Add button (or the Enter/Return key) AND save the post/draft to save them. (You can remove a tag by clicking the x next to it.)

The Categories box lets you categorize your posts by the broader topics of your blog. You can also add a new category from right inside this box—just click +Add New Category and you’ll get a text box to name your new category.

Note that the Add New Post page can be customized: you can drag and drop all six of these boxes to rearrange the page however you’d like.

Also on the Posts menu are pages to manage all your tags and categories. The Manage Tags page (click to enlarge):
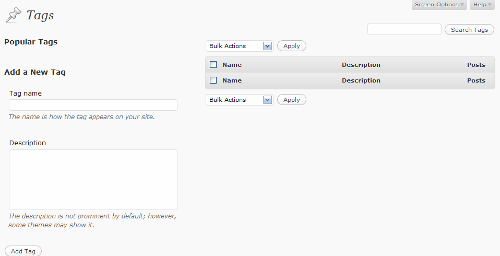
From here, you can add new tags, as well as edit the descriptions of existing tags. Once you’ve published posts with tags, your most used tags appear under Popular Tags. Also, an alphabetical list of the tags, their descriptions and the number of posts using those tags will appear to the right. As with posts, you can use the check boxes to select multiple tags to delete, or you can edit individual tags (such as to add a description) by clicking on the tag’s name. Clicking on the number of posts using them gives you a list of posts (on the Edit Posts page) using that tag.

The Categories page is very similar (click to enlarge):
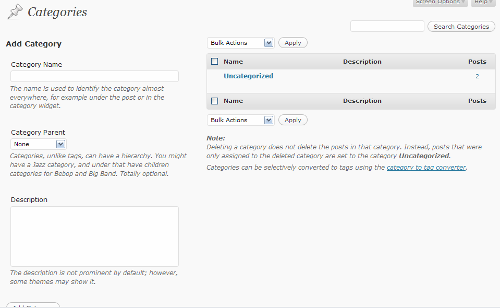
The most notable difference here is that “categories, unlike tags, can have a hierarchy.” Tags are all one level, but Categories can be “parents” or “children”—you can have one category broken up into multiple subcategories. With our knitting blog example, maybe under the Projects category, you have three subcategories: Cardigans, Pullovers and Socks.

(Why use subcategories instead of tags? If a topic is really central to the purpose of your blog and something you’ll be posting about frequently, but falls under the purview of a broader subject of your blog, a subcategory might be the perfect fit—but only you can decide what should be a tag and what should be a category.)

In addition to Posts, you can also have Pages on your blog. Posts are the temporal stuff—the day-to-day news updates, the regular content on your blog. Pages are for important information not tied to time, like your About or Contact pages. The Pages menu is further down on the left-hand side of WordPress:
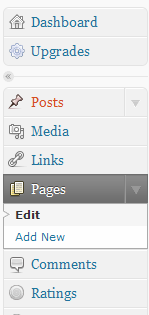
The two options, Edit and Add New, lead to pages almost identical to the Edit and Add New Posts pages.

The biggest difference in creating pages is that, like categories, you can have subordinate pages—for example, your About page might have child pages on your Biography, your Portfolio, etc. This is set in the Attributes box below the Publish box on the Edit or Add New Page page:
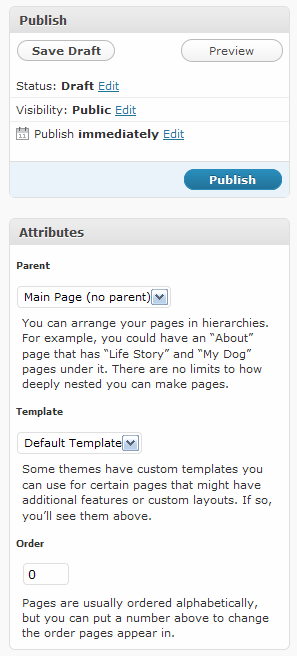
You can also use a custom template (if you dare) for certain pages—a different layout for a particular page, for example. The page Order determines what order your pages are displayed on your menu bar on your blog. If it’s not set, the pages are listed by date published.

Whew! Everything there is to know about the Posts and Pages menus on WordPress!