For a while I’ve offered a free PDF on how to set up WordPress on BlueHost to people who sign up for BlueHost with my affiliate link. But now I’m going to spread the love: I’m publishing all of the PDF here in a series on setting up a WordPress blog on BlueHost! So if you’ve been waiting to put your blog on BlueHost because you were worried about the technical stuff, this might be the perfect time!
BlueHost is one of WordPress’s recommended hosts and I’ve been with them for years. I definitely recommend BlueHost as a hosting company—and setting up WordPress on BlueHost just got easier. Disclosure: While I am a paying customer of BlueHost, I am also an affiliate for them. I receive a small percentage of any hosting purchase you make after clicking on the links to BlueHost in these articles.
Initial Setup Steps
If you did not register your domain through BlueHost, you will most likely have to set your nameservers. If, for example, you used GoDaddy to register your domain, login to GoDaddy. Click on the domain name you’re using with BlueHost. Once you get to the domain page, there is a button for Nameservers—click on it. A popup window will appear. Select “I host my domains with another provider.” The nameservers are set to something like “NS46.DOMAINCONTROL.COM.” Set the name servers to BlueHost name servers:
NS1.BLUEHOST.COM
NS2.BLUEHOST.COM
Each of these name servers should be on a separate line. There should be no other name servers. If your confirmation email from BlueHost listed other name servers, use those instead. Select “OK” to save your selection.
Once the nameservers have been set, it may take up to 48 hours for these settings to propagate around the web, so you may have to wait until you can access your website.
Login to BlueHost
Once your name servers have taken effect, you’ll be able to login to BlueHost from http://www.yourdomain.com/cpanel using your username and password. If you didn’t set your username to something specific, your user name is usually the first eight characters of your domain. You can also login from BlueHost’s homepage using your domain name and password. (All of this should be included in the information that BlueHost sent you when you signed up.)
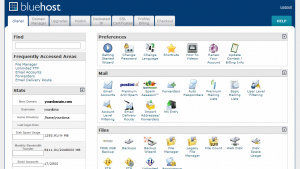
This should take you to your website’s control panel or cPanel:
Once you’ve logged in to your cPanel, you will want to complete the Getting Started Wizard that pops up if it’s your first time in your cPanel. This will help you understand many of the ins and outs of BlueHost and the cPanel as well as set up your first e-mail account(s).
Set Up WordPress
Once you’re into the cPanel home, look under Software / Services to find Simple Scripts.
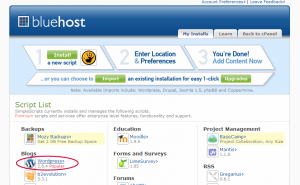
Click on Simple Scripts, which is an auto installer that vastly simplifies using many applications. (You can also use the Find box in the upper left hand corner—just type in “Simple Scripts” and it will show up in the right panel.) On the Simple Scripts page, there’s a list of software that it can install for you. Under Blogs, click on WordPress (circled in red below).
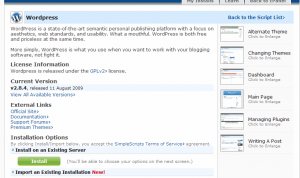
This will take you to a page with information about WordPress. Click on the green Install button to begin your new installation. (Even if you’ll be importing a blog from another platform, you don’t want to use the Import an Existing Installation option.)
Note that the right hand side of the page also has screen shots of a few steps in WordPress.
After you click Install, you’ll go to the first step of the installation.
Under Step 1, select the most recent (highest number) version with (Stable) beside it. For Where would you like your WordPress installed?, if you have more than one domain or subdomain on BlueHost, select from the pull-down menu. The second box is for if you want a your blog to be in a directory. I advise against this if your blog is the main portion of your site. In fact, WordPress has the ability to create pages and subdirectories to maintain the look and feel throughout your site. Unless your blog is truly tangential or not a significant part of your site, I recommend installing your blog in the root directory. To do this, leave the second box empty.
Under Step 2, click on Click here to display>
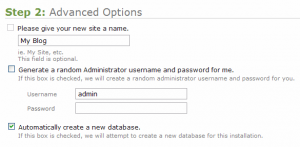
This will let you set options including the name of your website. Note that these can also be set or changed from inside WordPress.
Under Please give your new site a name, type in the name for your website. The site name is automatically set to “My Blog,” but you’ll probably want to change this. If your blog has a name or general title, or if you’re renaming your blog (especially to match your domain name), put it here. This title will appear in the header (both coded and visual) of every page of your blog.
Leave the next checkbox unchecked. Set the username and password to something you can easily remember. You may use your name or pseudonym as your username. This is what you’ll use to log in to WordPress, so it’s important to keep this information handy.
Leave the checkbox by Automatically create a new database checked.
Under Step 3, read the terms and license and check the checkbox. Then click the green Complete button.
You’ll go to a set up screen, which you can close if you want. If you stick around, you get the success message as well as links to your WordPress login:
Your site URL is what you set it to in Step 1, and your username and password are what you set them to in Step 2. The Login URL is your site URL with wp-admin added to the end (for WordPress administration). If you just barely set your name servers, it may take a while for them to be set; otherwise, you’ll be able to log in to WordPress using the address, username and password listed there. This information is also emailed to you.
Note: WordPress periodically releases updated versions of its software. To update an installation, go back to Simple Scripts. Your installed scripts are listed above the Script List, and you’ll have the option to update them. Click on the Upgrade Available link to update your blog. There is a potential for this to cause some problems with your blog or to reset some settings, so do backup your blog before updating. Because Simple Scripts’ upgrades are incremental, you may have to repeat the process if your installation is very old and you want to update to the latest version. Always deactivate all plugins before updating your WordPress installation.
Your blog is now set up. If you go to your website, you should now see the default template for WordPress. Naturally, you’ll probably want to select or commission a custom theme. (Next week!)
Ready to take the plunge? Sign up for hosting with BlueHost and set up your WordPress blog today!
