Categories
MetaBlogging

Blogger Finds the Happy Feed Medium

I’ve long said full feeds are the best option for bloggers and readers. But for some posts, a full feed isn’t the best option—and now Blogger users have even more feed options with the addition of Jump Breaks in the feed.

Jump Breaks have been around since September 2009 (announced on 09/09/09). Up until a few days ago, you could use Jump Breaks on your blog to truncate posts displayed there. Write a long post, but don’t want it making your homepage load so long? Insert a Jump Break a few paragraphs in, and the main page of your blog will only display the post to that point, with a link to see the full version.

To insert a Jump Break, you can click on the Edit HTML tag and enter <!– more –> . Or, in the Compose tab, you can click on the Jump Break button:

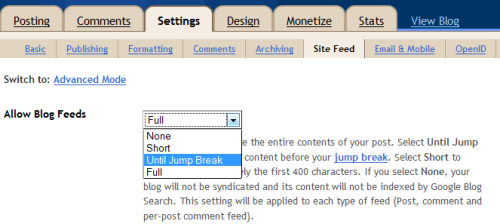
Now you can use the same function in your feeds. To enable the Jump Breaks in your feed, go to Settings > Site Feed. By “Allow Blog Feeds,” select “Until Jump Break.”

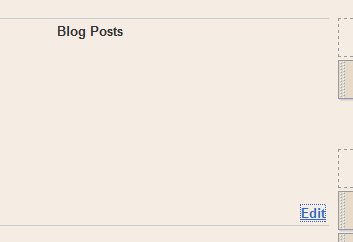
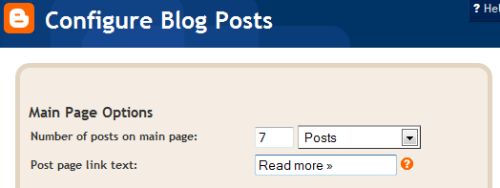
You can even customize the “Read more” text. Go to Design > Page Elements. Under Blog Posts, click Edit.

Then just change the Post Page Link Text in the popup window:

Why would you want to use Jump Breaks?
There are a lot of reasons to use Jump Breaks in your feed and on your blog. For example:

  • To cut off a long or image-heavy post that would take a long time to load.
  • To customize when and where you publish a “snippet” or “preview” feed.
  • To keep your homepage from getting too long.
  • To display a larger variety or number of posts on your homepage.

On other blogging platforms
If you use WordPress, this all might look a little familiar: you can also split posts in WordPress with the <!– more –> tag. You can type that in the HTML version of a post, or just use the more button: in the Visual tab or the HTML tab . You can even customize the text of the link it inserts, if you’re feeling ambitious.

In TypePad, you can split posts if you’re a premium subscriber.

What do you think? Do you or would you ever use this function? Why or why not?

Categories
MetaBlogging

Beginning with Blogger: Posts and Pages

This entry is part 2 of 3 in the series Beginning with Blogger
Print This Post Print This Post

While this post is intended for beginners, there may be something for all of us here. Did you know that Blogger now has “Pages”? This is a very cool, very important step for Blogger as a “full-featured” blogging platform. You don’t have to cobble together a menu bar or touch HTML or flood your feed as you create “About Me” and “Contact” pages. (Check out the fourth picture and description for more details.)

All right, so we’ve created a blog with Blogger and even made our first post. Now we’re ready to learn a little more about posting. When you log in to Blogger and go to your blog, click on the Posting tab. You’ll see you have four sub-options.

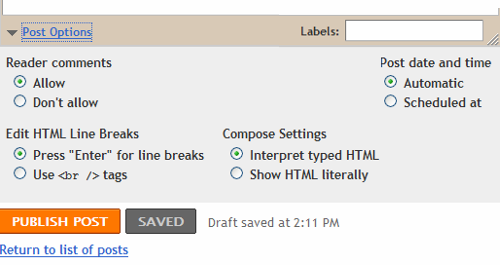
The first, rather obviously, creates a New Post. We already went over how to create a post, so today we’ll look at the Post Options below the post text box. Click on the triangle to open the Post Options:

Here, you can switch off comments on a case-by-case basis. (In a few weeks, we’ll find how to turn off all comments automatically.) Unless you want to code your posts in HTML, keep the Enter HTML Line Breaks set to Press “Enter for Line Breaks. And if you’re not entering any HTML (for example, the code for others to copy and paste to use a badge), don’t worry about the Compose Settings.

The Post Date and Time has two options: Automatic, meaning it sets the date and time of the post to whenever you hit Publish, or Scheduled, meaning you get to pick the date and time displayed on the post. You can pick a time in the past to post-date a post, or you can pick a date or time to schedule a post to go live in the future. (When you click the button by Scheduled, a box pops up for you to enter the date and time you want.)

Finally, note here the Labels. You can use these to assign your posts to categories, and organize them for you and your visitors. You can have many, many Labels on a post, using them as specific “tags” so you can keep track of all the topics you mention, or you can stick to 5-10 or so Labels total, and use them as broad categories to organize your blog into general topics.

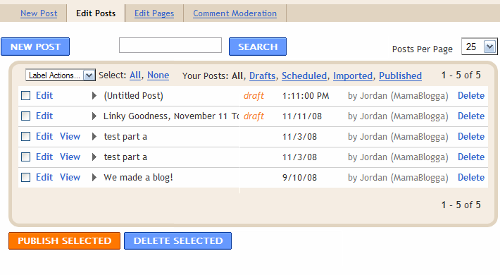
The next option under the Posting Tab is the Edit Posts option. This lists all your posts and drafts—and this is where to go to finish working on a draft post.

You can select some or all of your posts to add labels (with the drop down menu at left). You can also filter the posts you see by when they are or will be published: drafts aren’t scheduled to be published, Scheduled posts have been assigned a date and time and “published,” but aren’t visible on the blog yet, and Imported posts came from another blog (we’ll look at how to do that another week).

Warning: If you are saving draft versions of posts in Blogger, you may be publishing those posts to your RSS feed. When you publish the post later, it may not show up in feed readers again. So if you have a time-sensitive post (or just want to make sure your readers see your post when it’s ready, and only then), try using a test blog to draft, then cut and paste to your main blog. (I can’t find any documentation on this issue from Blogger, but I’ve seen this happen with half a dozen different Blogger blogs.)

On the line with the post, you can see the Title and the date or time (if recent enough) it was either published or last edited. To the left of the title is a little triangle—you can click on the triangle to see the text of the post without leaving this page. If a post has been published, you have the option to View just left of that. And left of that, you click Edit to finish or fix a post.

At the top, you can search in your posts or create a new post. At the bottom, you can publish or delete any of the posts you’ve selected with the check boxes on their lines.

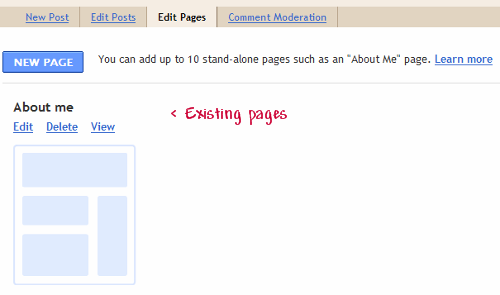
The next option under the Posting Tab is the Edit Pages option. Pages are not like posts. Posts are little bits of time. They have dates and times attached to them. They’re your weekly/daily/whateverly updates. Pages are for the information that’s almost always going to stay the same on your blog: who you are, how to contact you, etc. My pages are displayed in a line underneath my header. (Home, Blog Mentoring, About, Contact, etc.)

You can have the same layout easily with Blogger. (This used to be a lot of work!) Click on Edit Pages to view the page menu. Here, you have the option to create a new page. Below that, any existing pages are displayed. Click on New Page to create a new page.

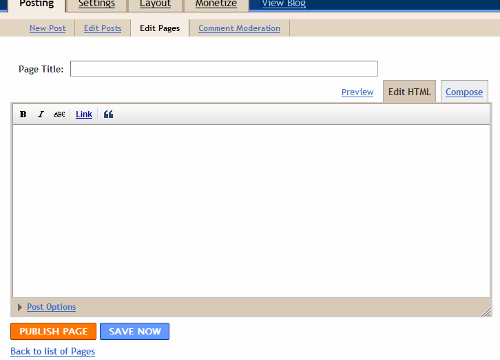
The Create a New Page page looks just like the create a new post page. Enter your title and text here, and click Publish Page to make it live.

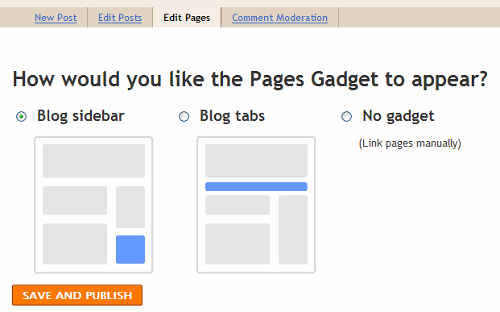
If this is your first Page, Blogger will ask you where you’d like the list of your pages to be displayed on your blog. I highly recommend the Blog tabs option.

When you visit your blog, you can see the Pages listed below the header:

The last option under the Posting tab is Comment Moderation. All this has is a link to the Settings page for Comment Moderation:

And we’ll talk about that with other settings!

There you go—now you can save drafts, create new posts and create pages for your Blogger blog.

Anything need to be clearer?

Categories
MetaBlogging

Beginners’ Guide to Blogger: Sign Up

This entry is part 1 of 3 in the series Beginning with Blogger
Print This Post Print This Post

We’re going back to the basics for this next blogging series: I’m going to alternate weeks on Blogger and WordPress.com, and go back all the way to the beginning. I imagine you probably already have a blog, and you’ve probably been through all these steps, but you may know someone who’s interested in getting started, but afraid to try. Fear not! It’s easy! And if you want someone to show you what to do, look no further, because here’s the Beginniners’ Guide to Blogger, part one: how to sign up and set up your blog the first time.

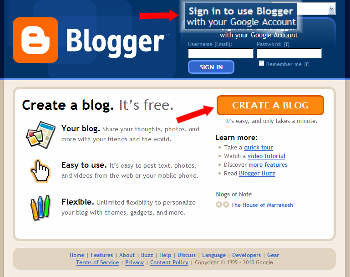
Go to http://www.blogger.com. Here’s what the screen looks like:

If you already have a Google account—such as for Gmail, Google Groups or Orkut—you can use that to sign in at the top. Otherwise, click the big orange button to create an account.

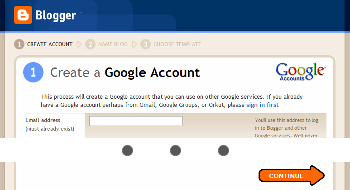
Account creation is easy. You do have to supply some personal details—but nothing more intimate than your email address. You also set a display name here, the name that appears at the bottom of your blog posts. If you don’t want to use your real name, be sure to set that to your pseudonym of choice.

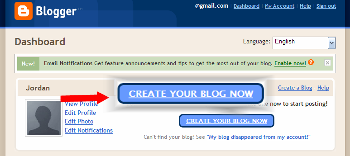
If you already have a Google account, when you sign in, you’ll see this. Click the blue button to create your blog:

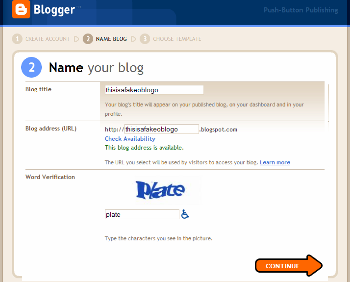
Whether you just created a new account or are using an existing account, the next step is the same (You can click to enlarge the picture below). You select a name for your blog (what will appear in big letters at the top of every page) as well as its address. Note that there are no @ signs in the name of your blog—@ signs are only used in email addresses! Your blog address will be whatever you choose (if it’s available), followed by .blogspot.com —in the example here, it’s http://thisisafakeoblogo.blogspot.com. Use the “check availability” link to make sure that address isn’t already taken.

Type in the spam-catcher letters and click the orange Continue button.

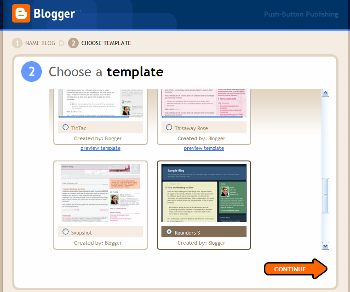
Next, you get to choose the template or layout and colors of your blog. There are several choices here, so scroll down to see them all and pick the one you like best. (Note: in an upcoming post, we’ll talk about how to get custom designs for your Blogger blog.)

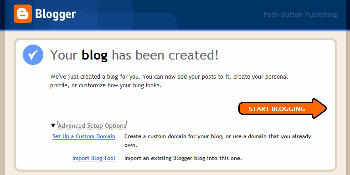
Voila! Your blog has been created! You can hit the orange Continue button here to start posting, or look at the Advanced Setup Options.

The advanced options allow you to get your own domain for your Blogger blog—i.e., ThisIsAFakeoBlogo.com instead of thisisafakeoblogo.blogspot.com. (Purchasing a domain will cost money. Here’s some of my advice on buying your own domain.) The other advanced option is to import a blog you already have into your new one.

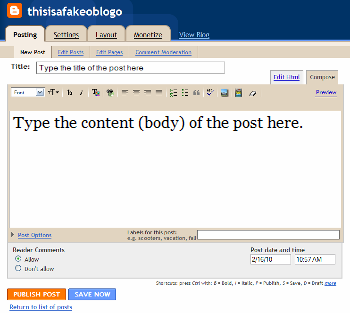
If you went with the orange Continue button, you’ll go right to the Write New Post page. Enter a title in the title box—the title of the post appears at the top of the post in big letters. (This post’s title, for example, is “Beginners’ Guide to Blogger: Sign Up.”)

In the larger box below, type the words you’d like to see in the content or body of your post. (I’m pretty sure we’ll also be talking about what all those buttons do soon, too.)

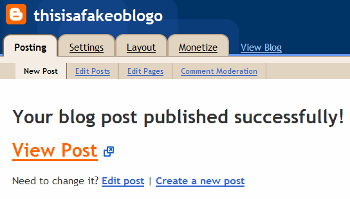
To save the draft to finish later, or to make sure you don’t lose your work should your computer or browser crash, click the Save Draft button. To publish it to your public blog, click the Publish Post button. Once you publish, you’ll see this:

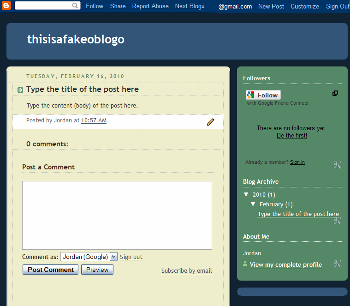
Follow the View Blog link to see your blog and your first post live in the world:

Congratulations! You just started a blog on Blogger!

What blogging topics would you like covered for Blogger or WordPress?

Categories
MetaBlogging

Blogger brings you Amazon Associates

A few months ago, we looked a how to sign up for and use Amazon Associates, an affiliate marketing program that gives you a small percentage of any sales you generate for Amazon. Now Blogger is making it even easier to use Amazon’s program—without ever leaving your post window.

You may have noticed the Monetize tab Blogger added back in April. Up until yesterday, only Google ads (AdSense) for your site and feed appeared here. Now you can also find your Amazon Associates information there, too.

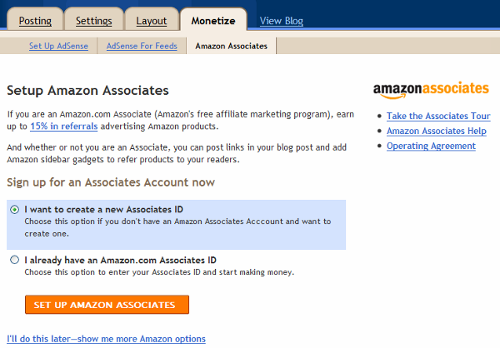
To start, go to Monetize > Amazon Associates. Here you can either enter your Associates ID if you already have one, or start the sign up process (and again, we have a step-by-step walk-through on signing up for Amazon)
blogazon1

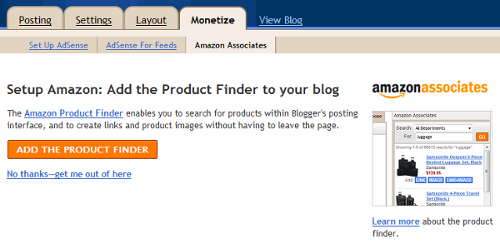
Once you’re finished with that step, you have the option to add the Amazon Product Finder to your Edit/Compose New Post page. I say go for it, and I’ll show you why.

blogazon2

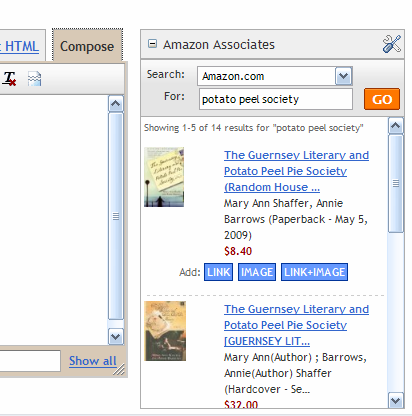
The Product Finder is a widget that lives on the Compose New/Edit Post page. When you’re working on a post and you want to include a product link to Amazon, just type in part of the name or highlight the title in your post (you can also search by category with the pull-down menu where it says “Amazon.com”).
blogazon3

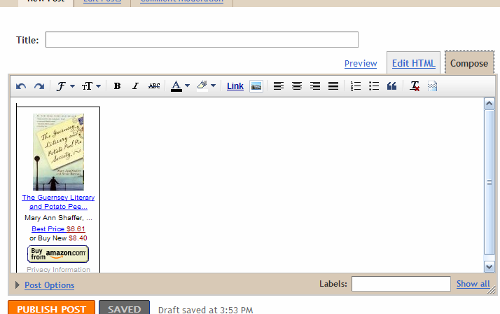
Once you find the product you want, you can choose the link type to insert into your post—text, image or both. In my example, I went for both:

blogazon4

There are lots of other ways to use Amazon on your blog—so get started!

Categories
MetaBlogging

The New Ultimate Guide to Migrating from Blogger to WordPress

UPDATED 26 August 2009, with minor updates throughout, and a big change to step 3.

Want a full guide to setting up WordPress on BlueHost, an inexpensive, WordPress-recommended hosting company? Sign up for BlueHost with an affiliate link on this page, and email me (guide at mamablogga.com) for a free PDF guide on installation, set up, WordPress, add-ons and more!

I made the move from Blogger to self-hosted WordPress more than a year and a half ago. At the time, I wrote the original ultimate guide to migrating, but a few things have changed in the intervening months. So I present the fully updated, all new, ultimate guide to migrating from Blogger to WordPress!

Be sure to check out my article on deciding and preparing to switch your domain. Once you’re sure you’re ready, then here are 10 steps to transferring your blog safely, completely and . . . well, awesomely. This method preserves your links, your subscribers, your comments and your content, and makes the move search engine safe.

Get the goods: a domain, hosting, and the WordPress software

1. Get a domain, preferably “yourblog.com.” Don’t own a domain? I use either GoDaddy or Bluehost for domain registration. Their prices are okay. I recommend three things here:

  • Get private domain registration. No junk mail, no strangers getting your address from your whois info.
  • If available, get yourblog.com , yourblog.net and yourblog.org. Sometimes GoDaddy offers a deal where you can get free private registration when you register 3 domains. (Then redirect .org and .net to the .com using account management. Select 301 redirects.)
  • If you go with GoDaddy, search for “GoDaddy coupon.” Click on the first result and use whichever coupon will save you the most money (calculate out the % to see which one that is if you have to).

2. Get hosting. I recommend Bluehost.com; they came highly recommended and are a pretty good deal. Also, they’re one of WordPress’s recommended hosts and feature a very simple install for WordPress.

UPDATED 3. Install WordPress. With Bluehost, just login to your control panel, click on Fantastico under Addons/Plugins Simple Scripts under Software/Services, select WordPress from the list, and click the green Install Now button (under Install on an existing server—even if you’re importing your old blog, you’ll be using a new installation of WordPress). Fill in the forms and you’re done. If your host doesn’t have a similar install, you’ll have to install manually. It shouldn’t be too hard; WordPress gives you instructions (and they claim it takes five minutes!).

Prepare to transfer your feed: you don’t have to lose any subscribers

4. Blogger enables you to transfer your subscribers seamlessly as well. If you haven’t already, sign up for a FeedBurner account (if you need a walkthrough to FeedBurner, check it).

Then, login to Blogger and go to Settings > Site Feed. In the Post Feed Redirect URL box, enter your new FeedBurner address. This will help redirect your subscribers.

Prepare your new WordPress blog: with some fun stuff

5. Login to your WordPress (might take a little time for the installation to “take”). Select “Options” then “Permalinks.” Select “Custom” and type this line in the box:

/%year%/%monthnum%/%postname%.html

This is to match the post structure of your Blogger blog, to minimize the number of broken links and redirects. (It’s possible to change this structure, too, of course, but it’ll take additional steps.)

Wendy Piersall has a few more steps to setting up your initial WordPress installation and getting it off the ground. All good steps!

Move your posts and comments

6. This is the easy part! In WordPress, go to Manage (Tools in WP 2.7+) > Import. Select Blogger from the list and enter your login information. This should automatically transfer all your posts and comments for you. 😀

However, some of your links won’t work anymore because Blogger and WordPress convert post titles into URLs differently—Blogger leaves out stop words like “and” and “the.” You can fix this, too, with another handy plugin, Redirection. Upload it, activate it and you can use it to easily track and redirect individual broken links (for example, from “/this-best-post-ever.html” to “/and-this-is-the-best-post-ever.html”).

There are also some other plugins to do this automatically. To get these (or any) plugins, in WordPress go to Plugins>Add New. Search for the plugins by name or related terms. (Searching for “blogger permalinks” brings up some plugins that can help with this and some of the other technical stuff.)

Transfer your feed: keep all your subscribers

7. Login to FeedBurner, go into the feed and click on “Edit Feed Details.” Change your Original Feed to http://YOURNEWURL.com/feed/ .

8. In WordPress, you’ll probably want to use FeedBurner as well, and if so, there’s another plugin to integrate the two services perfectly, FeedSmith, owned by FeedBurner (which is owned by Google).

Change over the URL: the final steps to move your blog

9. Back in Blogger, select Settings for the blog you want to transfer. Select Publishing. Click the top link, “Custom domain.” Type in your new domain, www.yourblog.com. Save. Now your links will transfer automatically to your own domain (though sometimes Blogger will show visitors a page to make sure they’re not being taken to a different site accidentally), but you’ll need one more step to transfer your blog home page over.

10. Still in Blogger, go to Layout>Edit HTML. Place the following code anywhere after <head>:

<meta content='0; url=http://YOURNEWURL.com/' http-equiv='refresh'/>

This sends visitors to your blog homepage directly to your new URL, and, as Sebastian’s Pamphlets says, is a search-engine safe method of redirection.

Like the change in step 9, this can show visitors a warning page that they’re being taken to another domain. Some might think that it’s just as good to put a link to your new URL in your old blog and leave it up. However, it’s better for your search engine rankings to transfer it like this—if search engines see two copies of your content around the Internet, they may try to penalize one or both of your sites for “duplicate content.”

Be sure to test your main blog URL as well as some of your old post URLs to make sure everything is working, and of course, be subscribed to your feed to make sure that’s in order as well.

And you’re ready to blog on wit’ yo’ bad self.

Note: You might have to import your images to WordPress as well, but I haven’t.

Want a full guide to setting up WordPress on BlueHost, an inexpensive, WordPress-recommended hosting company? Sign up for BlueHost with an affiliate link on this page, and email me (guide at mamablogga.com ) for a free PDF guide on installation, set up, WordPress, add-ons and more! (Note: you must sign up with an affiliate link to receive the guide.)

Disclosure: the GoDaddy and Bluehost link is an affiliate link.

Categories
MetaBlogging

What are Followers and how do I get them?

Not on Blogger? See more resources

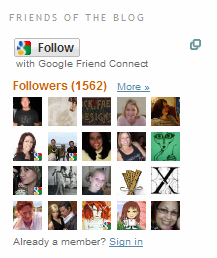
Have you see one of the most popular new widgets/gadgets on Blogger blogs lately? They’re popping up all over: Followers. A grid of user pictures in the sidebar of popular blogs, showing off the wonderful mix of people that this blogger attracts.

followers1

So what’s this all about?

What’s Following?

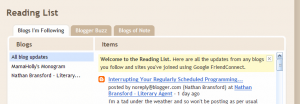
Following is a lot like subscribing using RSS. When your visitors “follow” your blog, they get updates from your blog (and all the other ones they follow) in a centralized location—this time, though, instead of Google Reader or Bloglines, it’s their Blogger Dashboard:

followers4

How Do I Follow?

To follow your favorite blogs, click on the Follow button on their sidebar widget. You then get to choose what account to use to follow the blog—Google, Yahoo, AIM, Open ID or Netlog. (Google includes your Blogger account.)

followers2

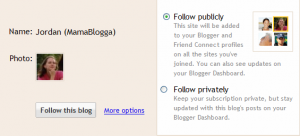
Once you’ve signed in, Blogger gives you the option of following the blog publicly or privately.

followers3

Either way, you get to read updates on your dashboard, but if you don’t want this site added to your Blogger/Google profile, select Private. Note that Following a blog might also result in it being added to your Google Reader. Hasn’t happened to me, but I’ve heard reports.

Why Do I Want Followers?

You want followers for the same reason you want subscribers—it grows your audience. (If you don’t want that, that’s okay, too, of course.) Blogger Help explains this well:

The Followers widget is a great tool to help you grow your blog’s audience. Readers often visit a blog and enjoy it but fail to return. With the followers widget you can get all readers to return and become a fan.

You can also use a Followers widget to better connect with your readers—to see who they are and to find and comment on their blogs, even if they’ve never commented on yours.

How Do I Get Followers?

First things first, you have to add the Followers gadget. This is available primarily to Blogger blogs, but if you run a blog on your own hosting, you can also add the widget if you sign up for Google Friend Connect.

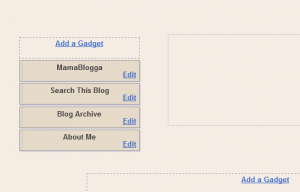
To add the gadget in Blogger, go to Layout > Page Elements (the default tab under Layout). Choose where you want the Followers box—your sidebar, your footer, whatever:

followers5

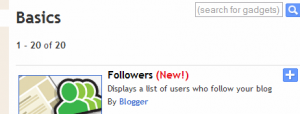
Click on “Add a Gadget” in your desired place. A window with a list of choices pops up. Right now, Followers is #1:

followers6

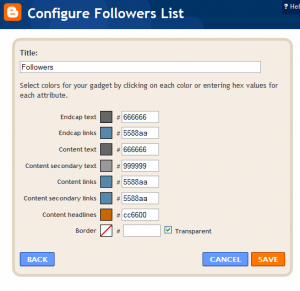
After you click the plus button to the right of Followers, you’re given options to give the Followers box a title (in my above example, from Literary Agent Nathan Bransford‘s blog, the title is “Friends of the Blog”) and to customize the colors to match your layout:

followers7

Once you’ve added the Followers gadget, you’ll want to encourage your readers to follow your blog. Again, Blogger Help has some good advice here:

  • Write a post about your followers widget.<l/i>
  • Encourage all readers to become a follower [Well, unless you’re a grammarian. Then you’ll encourage all your readers to become followers, because I don’t think it’s very healthy for all your readers to become just one follower 😉 ].
  • Put your followers widget at the top of your sidebar so more readers will notice it.
  • Many readers ignore sidebar items so by writing a post about your followers widget and moving the widget to the top of your sidebar, you will inevitably grow your audience.

The best way to encourage people to follow your blog is to have awesome content—something they’ll want to come back and read again.

Learn more about attracting readers with RSS and getting your visitors to stay and subscribe. I’ve written a free guide to increasing your blog’s stickiness, “Get Your Visitors to Stick!

Good luck garnering Followers!

add to kirtsy | More WFMW